Croissant Pudding with Berries | Budinca de Croissante cu Fructe de Padure

I first sampled this recipe in India, while on a work trip to Gurgaon. The hotel I was staying at had this fabulous breakfast buffet with many Western and Indian delicacies. This pudding was one of the desserts offered, and it was so good that I always made sure to have space for it at the end of the meal. And it's not only that it's very tasty, it also has such a beautiful blend of so many inviting colors: there's brown from the croissant shells and yellow from their insides, plus red from the jelly (I'm sure the recipe can't be as good if the jelly is not red, but then I tend to be silly sometimes), and dark blue from the blueberries.


I wanted to share this recipe with my family and friends, so I've been experimenting ever since I got back. Here is the recipe, for you to try.


Ingredients:
 - Three large croissants
 - Four eggs
 - Two cups of milk
 - One cup of fresh or frozen berries
 - About a fourth cup of raspberry or strawberry jelly
 - Four tablespoons of sugar
 - One tablespoon of vanilla essence
 - One tablespoon of lemon zest or orange marmelade
 - A dash of salt
 - Butter to coat the pan (about a tablespoon)
 - (optional) Powdered sugar and extra fresh berries for serving


Preparation:
 - We want multiple beautiful colors in our dish: yellow from inside of the croissants, brown from their crusts, and red from the jelly. Split the croissant lengthwise, then gently tear each down into smaller pieces. Place a bit of jelly in the center of each piece without spreading it too much, then layer in a pan (I use a 4 qt dutch oven). Distribute the berries all thoughout.
 - Mix the eggs, milk, sugar, vanilla, lemon zest, and a dash of salt. Gently pour over the croissants in the pan. Let everything soak for 5-10 minutes.
 - Bake at 350 for about an hour.
 - Serve warm, with optionally some powdered sugar sprinkled on top.
.


Presentation:
 - Place the extra fresh berries on top, if you have any.
 - A few leaves of fresh might could contribute additional color to the presentation, if you want to go the extra length. I usually find variety of colors already in the pudding to be sufficient.

Perfect Soft-Boiled Eggs

I recently discovered that I love eggs in three different ways. First, in cakes and desserts (who doesn't!). Second, I really enjoy Deviled Eggs. And finally, I am a big fan of soft-boiled eggs, which in my opinion are when the whites have an almost solid consistency, while the yolks are runny.


The eggs to be boiled can be either straight from the fridge , or they could have been kept at room temperature for a few minutes, for example while the water was heating up. Please note that adding too many cold eggs in a smaller pot lowers the water temperature, which can lead to undercooking; to be safe, do not boil more than two eggs at a time, or use a very large pot with a lot of water, such that adding the eggs does not make much of a difference.


Ingredients:
 - Eggs
 - Salt
 - For decoration: colorful accompanying veggies (tomatoe, cucumber, bell pepper) and cheese


Preparation:
 - Bring water to a boil in a medium pot. Reduce the heat to medium.
 - Carefully add the eggs to the boiling water, and set a timer for precisely six minutes.
 - Once the time is up, promptly remove the eggs from the boiling water and place them for one minute in a bowl with cold water. This stops the cooking, such that the egg yolks do not firm further.
 - Serve immediately, as they're perfect in both temperature and texture.


Presentation:
 - I prefer using egg cups to serve the soft-boiled eggs. The reason is that it makes it easy to start enjoying the egg from one end, with a spoon and a bit of salt, while still having your hands free to grab other foods that go with it.
 - I chose to present the egg on a yellow plate with an interesting pattern all around it: the color matches that of the yolk, while the pattern adds visual complexity to the fairly basic dish.
 - Finally, I placed some cheese and veggies all around the plate: they add freshness and complement the egg, while also contributing some color to the presentation. I recommend a variety of basic colors: green/white from cucumbers, red from tomatoes, green/yellow/orange/red from bell peppers, alongside the light color from the cheese.

Sauerkraut Salad | Salata de Varza Murata

It's the holidays season. We are fortunate enough to be able to fill our table with lots of goodies, many of them specifically prepared for the celerations. The salad in this post is like the perfect wingman for the main meaty entree (we served it yesterday alongside roasted chicken): it is light and refreshing, and contributes its flavors to keep the lights and attention on your pièce de résistance.


As is the case with every salad, the quality of the ingredients is of utmost importance. If you want to try this recipe, I encourage you to look for the highest quality sauerkraut you can find (homemade would be great, like I was lucky to have) - yes, some sauerkraut can be much better than other!


Ingredients:
 - Two cups of sauerkraut
 - Two tablespoons of olive oil
 - Spices: freshly ground black pepper and paprika (optional, for color)


Preparation:
 - The recipe is as simple as it gets: we mix the sauerkrat (which contributes most of the taste and texture) with olive oil (which adds smoothness), black pepper (which adds a bit of a kick) and paprika (which adds a bit of color).


Presentation:
 - The dish is delicious, but simple looking. You can compensate for that by presenting it in a nice colorful bowl or plate.

Pickles | Muraturi

Pickling is one savory approach to preserve fruits and vegetables for a few months. The most popular pickles in Romania are made with cucumbers, unripe tomatoes (green ones are ok, but the orange almost-ripe-but-not-quite-there-yet ones are perfect), and bell peppers (often stuffed with shredded cabbage). The most out of the ordinary one that I've ever encountered used watermelon - they were quite tasty, but only the rind had some firmness left in it. Pickles are very common in Romania during the winter and spring months, when they are used as side dishes to complement stews and other entrees.


Note that all quantities presented below are approximate: what you end up needing depends on the size of the jar and how tightly you pack everything in. Consider preparing a bit more brine than you need: you'll find it preferable to preparing less and having to do a second batch. Also, consider preparing more jars, as they take a while to be ready and are finished quite quickly.


Ingredients:
 - Two cups of vegetables: green tomatoes, mini bell peppers, slices of carrots and/or cucumbers, and whatever else you might be in the mood to pickle
 - One and a half cups of water
 - Half a cup of vinegar
 - Two or three garlic cloves
 - A dried chili pepper
 - One tablespoon of pickling salt or sea salt
 - One teaspoon of spices: mustard and dill seeds (whole). I use a pack of pickling spices, which also includes cumin, bay leaves, black pepper, and other goodies.
 - A few long dill or cilantro stems.


Preparation:
 - Carefully wash the vegetables, slice whatever is needed (for example, the carrots or cucumbers), and peel the garlic cloves. Place them all in a clean jar, together with the chili pepper. Place the dill or cilantro stems on top: they add flavor, but also secure the vegetables and keep them submerged in the brine.
 - Place water, vinegar, salt and spices in a pot, and bring them to a boil. When ready, carefully pour everything over the vegetables all the way to the top of the jar - least air helps preserve this for longer, as bacteria don't particularly enjoy the salt and vinegar in the bring. Seal the jar tightly when ready.
 - Let the pickle jars sit in a dark cool corner (e.g. in the pantry, if you have space) for about a month, before serving.


Presentation:
 - Remove an assortment of pickled vegetables from the jar, and offer them as a side dish to an entree of your choice. My favorites pairings include pickles with the vegetable medley stew, the rice pilaf with chicken, or the bean stew with smoked meats.

Vegetable Medley Stew | Ghiveci de Legume

If you are ever in the mood for a lot of different vegetables in a juicy stew, then you should consider this Romanian recipe. The ingredients listed below represent a sample of delicious fresh vegetables that are easily available in the fall in my home country, and they are the ones I grew up enjoying in this dish. However, feel free to use any others that you like, or change the quantities and proportions in any way that you prefer.


You should also note that there are quite a bunch of ingredients, which means that you will likely end up with a lot of food. Plan for having family and friends over to enjoy the food, or consider freezing some of it for a later time.


Ingredients:
 - One yellow onion
 - One leek
 - One parsnip
 - One celery root
 - Two zucchini
 - Eight small yellow potatoes (or four-five larger ones)
 - Eight-ten fresh tomatoes, or one 28 oz can of diced tomatoes
 - A small head of cabbage
 - Three or four cups of green beans
 - Two colorful bell peppers
 - A small head of cauliflower
 - Two cups of peas
 - Two cups of chickpeas, or one 15 oz can of chickpeas
 - Half a bunch of parsley
 - (Optional) A pound of pork shoulder or other meat for stews
 - A quarter cup of oil
 - Spices: salt, pepper, thyme, bay leaves


Preparation:
 - Use a large pot that can accommodate the entire dish.
 - If you have meat, start by cutting it into small pieces, and quickly fry it on high heat in oil until it turns brown. Do not cook it thoroughly at this point - it'll cook later on with the vegetables anyway. Remove the meat from oil and set aside.
 - Clean and cut the onion, leek, parsnip, and celery root. Cook them in oil on medium-high for about 5 minutes, and stir regularly to not burn. Add a cup of water and cook for another 10 minutes while stirring regularly.
 - Meanwhile, clean, peel, and dice the zucchini into cubes. Add them to the pot, and cook for another 5 minutes.
 - Clean, peel, and dice the potatoes. Add them to the pot, together with the can of tomatoes and two cups of water. Add spices: I used eight bay leaves, a bunch of fresh thyme. Also, add salt and pepper to taste (prefer to add less than needed, as more can be added later). Stir gently, and reduce the heat to medium-low.
 - While the dish is cooking, we'll quickly proceed with the remaining vegetables. Start with the cabbage (cut it into smaller pieces and add it to the pot), then the green beans (cut into 1-1.5 inches long), bell peppers (diced), cauliflower (separate the florets), and finally the peas and chickpeas.
 - Add the cooked meat back to the dish (if you're using that).
 - Cover and simmer on medium-low heat for another 30 minutes (until the potatoes are cooked). The dish should be about three-quarters submerged in liquid.
 - Remove from heat. Sprinkle the chopped parsley on top, cover, and let sit for 5 minutes (or until serving time).


Presentation:
 - The dish has a bunch of cooked vegetables: they're certainly healthy, though maybe not the sexiest photo models. One trick to improve the presentation is to select vegetables of a varied assortment of colors: orange and red from carrots, bell peppers, and tomatoes, green from the peas and green beans, yellow from potatoes, and lighter colors from cabbage, cauliflower, parsnip and celery root.
 - Some fresh chopped parsley added right on the plate adds a touch of color and freshness to the dish.
 - For meat lovers, consider keeping the meat out of the stew, and instead serve the dish accompanied by a fried or grilled piece of meat (sausage or pork chop). The meat then adds a beautiful spot of brown deliciousness to the presentation.
 - Finally, the vegetable medley stew goes really well with pickles, a slice of bread, and maybe a beer.

Sarmale de Post cu Nuca in Foi de Vita | Walnut and Veggies Stuffed Dolmades

The spring has finally arrived, and Easter is just around the corner. The recipe presented here has its roots in the observance of Lent, during which time the chef of the house might prepare a vegetarian stuffed dolmades. My mom certainly did. I remember her preparing one of two basic variations: filled either with only rice, or with a mixture of rice and finely-chopped mushrooms. As you might imagine, both are simple and neither taste like much. This might serve as a reminder that you are sacrificing something (meat) during Lent. However, one should also have the option to give up meat without giving up the flavor.


We have two main types of 'sarmale' in Romania, where I am originally from: some are rolled in pickled cabbage leaves and others are rolled in young vine leaves. While the stuffing is usually similar for the two, that's pretty much the only thing they have in common: the former are usually sweet and sour (sweet from the meat and tomato sauce and sour from the pickled cabbage leaves and/or sauerkraut), while the latter have a very distinctive texture from the thin vine leaves. The latter is a special treat around Easter and during the spring in general, once the vine leaves are fresh and tender.


Ingredients:
 - One red bell pepper
 - Half a cup of olive oil
 - One onion
 - One large head of garlic
 - One bunch of dill
 - One bunch of parsley
 - One 14 oz can of diced tomatoes
 - One 14 oz can of tomato sauce
 - Four eggs
 - One red beet
 - One cup of rice
 - Two medium-sized squash
 - One pound of shelled walnuts
 - One pound of fresh vine leaves (or marinated, if it is the only option)
 - Spices: salt, pepper, thyme, paprika, bay leaves


Preparation:
 - Bring two cups of water to a boil. Rinse the rice separately, then add it to the boiling water, reduce the heat to low, cover with a lid, and keep on cooking for 20 minutes. Make sure the pot you use is large enough to allow the rice to expand without overflowing. When ready, gently stir in the rice with a fork to increase its fluffiness. Set aside and let it cool.
 - Meanwhile, boil the red beet (about 30 minutes). Peel and set it aside to cool down (you can submerge it under cold water to speed up the process). Once you can handle it, shred it through a grater.
 - While the rice and the beet are cooking, peel the carrots and squashes and shred them through the grater. Also, mince the red bell pepper and the walnuts (no meat in this recipe, but walnuts add some proteins).
 - Peel and mince the onion and the garlic head.
 - Add the bell pepper, onion, and carrots to a pan, add a bit of oil, and fry on medium heat for 5-10 minutes. This helps bring out the flavors.
 - Break and beat the four eggs, separately.
 - Chop the dill and parsley.
 - Now to mixing everything: in a large pot, mix the rice, shredded beet, bell pepper, onion, carrots, garlic, olive oil, chopped dill and parsley, tomato sauce, eggs, walnuts, and squashes. Add salt, pepper, thyme and paprika, to taste. This forms the tasty filling for our dish.
 - Coat a large pot with a bit of oil. This is where the cooking will happen, and we don't want to dish to stick to the bottom. Please a few bay leaves at the bottom of the pot, for flavoring.
 - Take one grape leave at a time. Place a tablespoon or more of the filling in the center (or more, depending on the size of the grape leave). Carefully wrap the leave around such that the filling cannot escape. Place carefully in the pot, and pack them tightly. Proceed to the next grape leave (expect the process to take a while, the exact amount depending on your dexterity).
 - Mix the can of diced tomatoes with water in a separate bowl. Pour the mixture over the sarmale into the cooking pot. If needed, add more water until the sarmale rest under about half an inch of liquid (some of this liquid will evaporate during cooking).
 - Cover, and bake at 400F for one hour.
 - Enjoy hot, usually with bread, sour cream, and maybe a hot red pepper (if you like your food spicy).

Presentation:
 - The dish requires ample preparation time, so it's not very common (usually reserved for guests or special occasions). I find the best presentation to come from the number and the pattern formed by the tightly packed sarmale in the dish, so I usually pick a nice pot to cook the dish in, then serve them directly from the pot. Even if I transfer them to a plate, I think the best presentation involves a large plate that accommodates a good number of sarmale.
 - If you feel something is missing in just numbers and pattern, it's probably color (cooked grape leave are not very colorful). Consider adding some fresh colors: red (a hot pepper or some paprika), white (sour cream), and maybe greens (e.g. a branch of fresh thyme). Alternatively, you can use dill instead of thyme, but I'd chop it and mix with the sour cream, such that it pops up more.

Peach Caprese Salad | Salata Caprese cu Piersici

Have you found delicious tomatoes and peaches in your garden, and are looking for the perfect summer recipe? This salad is one of my family's favorites: juicy, soft, and flavorful. Give it a try and it might become your favorite too!


The dish is quite simple and it involves no cooking (provided you already have the balsamic glaze). And, as with most simple recipes, the secret is in using high quality ingredients: make sure the peaches and the tomatoes are ripe, juicy, and sweet.


Ingredients:
 - Two or three ripe tomatoes
 - One of two juicy peaches (nectarines work equally well)
 - A few fresh basil leaves
 - Preferably one or two pieces of burrata cheese, or mozzarella cheese in its absence
 - Balsamic glaze
 - Olive oil
 - Salt and pepper


Preparation:
 - Wash the tomatoes and the peaches, and cut in slices or cubes of roughly the same size.
 - Add the burrata or mozzarella cheese.
 - Tear the basil leaves and scatter them on top.
 - Sprinkle a pinch of salt and pepper.
 - Finally, drizzle olive oil and balsamic glaze over the salad.


Presentation:
 - I prefer burrata over mozzarella cheese for this salad. The former is soft and mushy, and looks most presentable in one piece (which I like to slice in the center to reveal the creamy interior). If you're using the latter, you can easily cut it into pieces (about the same size as the tomatoes and peaches), and then evenly scatter them throughout.
 - The balsamic glaze contributes a bold flavor and nice strong pattern on top of this colorful dish, and as such should be added as the last step. If you're missing glaze, you can prepare it from balsamic vinegar by following these easy steps: bring balsamic vinegar to a boil, then reduce heat and let simmer for 15 minutes, and finally let cool before using.

Romanian Beef Tripe Soup | Ciorba de Burta

This post presents a delicious and fairly unique authentic soup from my home country Romania. Informally, we call this "the queen of soups", and it is considered a rare delicacy. It is sweet, sour and garlicky, with many other subtle flavors that blend together under the surface. The soup is so simple that many of these aromas are magical: the guests are left wondering where they all come from when the dish seems to only have water, tripe, and a couple of vegetables. The obvious answer is that all these mysterious flavors come from the chef's artful technique, which is the explanation I usually go with. Serve hot with a pickled hot pepper, and it will provide an unforgettable experience for you and your guests.


Ingredients:
 - Two pounds of beef bones (optionally with a bit of meat). I prefer beef shanks or short ribs
 - Six pounds of beef trip (honeycomb)
 - One celery root (peeled, whole)
 - Two parsnips (peeled, whole)
 - Two squash (peeled, whole)
 - Three yellow onions (peeled, whole)
 - Four carrots (peeled, whole)
 - 20 ounces of sour cream
 - Six egg yolks
 - Three heads of garlic (peeled)
 - Half a pound of pickled paprika or peppers (cut into stripes)
 - Five bay leaves


Preparation:
 - Cut the honeycomb tripe into strips. it's a fairly tedious process, so start early and see it to completion.
 - Boil the beef bones in about 2 gallons of water for an hour hour (or until any meat easily falls off the bone). Remove the froth regularly to keep the broth clear. When done, add the celery root, parsnips, onions, and carrots, and boil for another 45 minutes (or until you can easily pierce them with a fork).
 - Remove all bones from the broth, and discard them.  - Remove all vegetables from the broth. Save one carrot separately. You can use all others (minus that one carrot) separately for a boeuf salad, for example.
 - Add the tripe strips and boil for another hour (remove the froth regularly to keep the broth clear).
 - Separately, mix 20 oz sour cream with 6 egg yolks. Scoop one cup of hot broth and mix with the sour cream. Repeat this a few times until the temperature of the sour cream rises. Poor over the broth and mix thoroughly.
 - Mash the three heads of peeled garlic, and add to the soup
 - Finely mash the saved carrot, and add to the soup. This adds a beautiful orange tint to the soup.
 - Add the pickled pepper stripes and mix.
 - Stop the oven and set aside.
 - Serve hot, accompanied by slices of bread. You should also have some salt, pepper, vinegar, and garlic sauce ready for use.


Presentation:
 - The best presentation involves both color and texture. The honeycomb tripe has such a brilliant pattern, and you should try to stack a few pieces in the middle of the plate such that some of them show over the surface.
 - As for color, the pickled peppers tend to rise to the top, adding some beautiful red accents. This nicely complements the yellow and orange color of the soup.
 - Feel free to sprinkle some flakes of fresh parsley for a hint of green.

Fusion Garlic Sauce | Mujdei Taiwanez

Romanians love raw garlic with their food: you might know this by now if you've followed my recipes. One other thing I personally like is spiciness. I particularly felt in love with the spicy chili crisp used in the Chinese cuisine: it has crunchy texture, great flavor, and it always leaves me craving for more. One day, I thought about introducing this spice into a Romanian-Asian fusion dish. And what is more Romanian than our quintessential defense-against-vampires potion? So, there you have it: a traditional Romanian garlic sauce, with a generous drop of Asian spiciness, all brought together by an oriental sesame sauce.


Ingredients:
 - Crushed garlic (two tablespoons)
 - Chopped parsley(two tablespoons)
 - Sesame sauce for shabu-shabu (four tablespoons)
 - Spicy chili crisp (two tablespoons)

I thought sharing a pic of the ingredients would ease finding them in stores, so here it is. You may want to look up the sesame sauce and the chili crisp in an Asian grocery store or online. I always use the Lao Gan Ma brand (it translates to Old Godmother, and she really knows how to do it well!).


Preparation:
 - Peel and crush a couple of garlic cloves.
 - Finely chop a bit of fresh parsley.
 - Now you have all the ingredients ready. The presentation looks better if they are not mixed yet, in my opinion.


Presentation:
 - Carefully place the ingredients in a smaller bowl. The ingredients have a nice variety of color, so you don't need to do much else.
 - I believe this recipe goes extremely well with a juicy meat, like a roasted chicken. For a fun presentation, you can sneak the garlic sauce bowl among chicken pieces on a larger plate (like in the photo above).

Creamy Soup of Vegetables and Chicken | Supa Crema de Legume cu Pui

My brother and I gave our mom a really hard time as kids, particularly when it came to her cooking: for one reason or another, we always thought everyone else cooked better than she did, and we never shied from expressing our expert opinions on the matter (truth be told, our mom was a fabulous cook, but it took us many years to realize that). At one point, we let her know that her soups cannot match the awesome delicacies served at our kindergarten. The reason was very simple: our lives were already full of hardships (like fighting over toys or screaming our lungs out), so she could not really expect us to have much energy left in us to also chew the vegetables in the soup. The amazing chefs at our kindergarten were aware of the complexities of a kid's life, and they created this amazing soup that had no vegetables to chew on (looking back, it was just water boiled with soup seasonings, almost nothing natural or nutritious). Our mom did not believe us at first, but after a few meals where we did not touch the soup, she decided to prepare a special soup for us, according to our specifications. The recipe below was her best attempt at creating a soup that is nutritious and healthy, while not having any vegetables nor meat in it.


In her unlimited wisdom, our mom selected a lot of lighter colored vegetables for the soup - it's easier to conceal a peeled summer squash or parsnip in a soup, then it is to achieve the same effect with a red bell pepper. She was a great cook, but she was not Harry Potter. After boiling everything, she mashed them individually and made them lost in the soup, which became very creamy as a result. Her biggest mistake was that she mashed them by hand, which allowed us to spot a few minute pieces of carrots upon careful examination of her creation. But the soup was too delicious, so we forgave our mom for her cunningness and we kept slurping her savory concoction.


Aside from being a great food for kids and a welcome change from a regular soup, this recipe is also great for situations where a loved one has difficulties chewing. For example, when he or she gets the wisdom teeth removed. Give it a try, and I assure you that your efforts towards preparing the dish would be greatly appreciated.


Ingredients:
 - Two yellow bell peppers
 - Two summer squashes
 - Two celery sticks
 - One yellow onion
 - One carrot
 - One parsnips
 - Five or six potatoes
 - One small celery root
 - One and a half pounds of chicken (preferably with skin and bones - legs, wings, backs)
 - Spices: salt, a tablespoon of black peppercorns, four or five bay leaves


Preparation:
 - Wash, clean and peel the vegetables. Place them alongside the chicken in a large pot.
 - Add one gallon of water, the black peppercorns and the bay leaves.
 - Bring to a boil, then reduce the heat to medium, cover, and continue cooking for an hour and a half.
 - Remove from heat.
 - Pick the vegetables and place them separately.
 - Pick the chicken pieces. Separate the meat and discard the bones and the skin.
 - Sift the soup through a cheesecloth, and discard the bay leaves and the peppercorns - they already added flavor to the soup.
 - Run the vegetables (minus the carrot) and the chicken meat through the blender (use some of the soup to get it going). Mash the carrots separately: similarly to my mom's original recipe, I like to see very small pieces of the carrot in the soup, and not really a puree of it (which would change the color of the soup).
 - Finally, mix the vegetables and chicken with the remaining soup. Add salt to taste.
 - Serve warm.


Presentation:
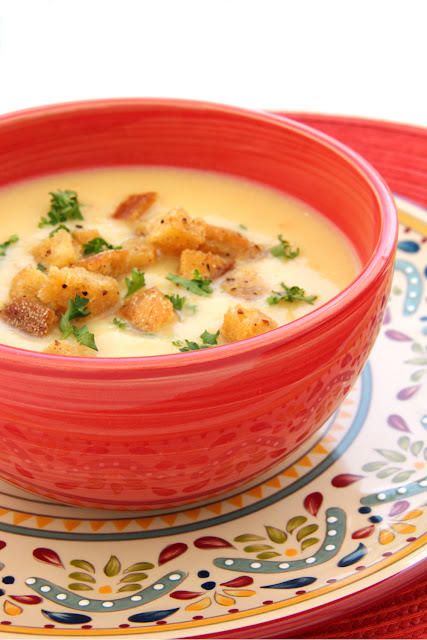
 - Place the soup in a nice colorful bowl for serving. I prefer a red or orange bowl, as it matches the occasional small pieces of carrots in the soup.
 - Garnish with croutons and chopped parsley to add further color and texture.

Authentic Romanian Homemade Borsch | Borş De Casă

Sour soups are so common in Romanian cuisine that they have their own name - 'ciorbe' (singular: 'ciorbă'). I've previously detailed two such delicious recipes: Sour Beef Soup and Meatball Soup, if you'd like to give them a try (if you fear the sourness, plan to complement the flavors with a bit of cream for extra smooth richness). There are a few alternatives to make the soups sour, including using lemons or sauerkraut juice. But by far the most authentic approach is to use a special ingredient named "borsch".


I have never seen borsch being homemade in Romania - my mom always bought it from someone else. Once I moved to the United States of America, I learned of three approaches to procuring this ingredient. The most common one was to give up on the idea of getting it, and use lemons instead (we'd do this sometimes in Romania as well, though it's not really authentic as lemons don't even grow in the country in the first place). The second approach was to bring concentrated packages of borsch from back home, which cooks would ration to last them until their next trip over. Finally, some courageous hearts would pack a few litters of borsch in their checked in luggages, then fly them over - uncommon but not unheard of. In the past, I usually opted for the first approach - it does satisfy the craving. I recently decided that there should be an easy recipe for authentic homemade borsch. The preparation is primarily hands off and takes a few days, at the end of which you will be the proud owner for several litters of an authentic ingredient for your soups. Oh, and did I mention that borsch has countless therapeutic benefits when ingested in and of itself?


Ingredients (makes about 3 liters of borsch):
 - Half a pound of unprocessed wheat bran
 - One slice of bread
 - Two tablespoons of coarse corn grits
 - One fresh celery stick
 - Five to ten twigs of fresh Italian parsley


Preparation:
 - You will need a large lidded jar (one or two gallons) for this recipe.
 - Tear the slice of bread into very small pieces, and drop them in the jar. Add two cups of wheat bran and two cups of water, then mix. Cover with the lid, and let sit for two days at room temperature (I find it handy to keep it in the kitchen, where the temperature is around 70-75F).
 - After two days, you will sense a sour smell when you lift the lid off the jar. You obtained the fermented bran base (it is called 'huște' in Romanian) for preparing the borsch.
 - Add the remaining wheat bran over this fermented bran, two tablespoons of corn grits, and three liters of warm water. Give it a though mix.
 - Cut the celery stick into two or three smaller pieces, and add them and the parsley twigs to the jar. Together, they will add extra flavor to the borsch.
 - Cover, and let sit for two to four days at room temperature. Stir regularly with a wooden spatula: this speeds up the fermentation process. I keep the jar in the kitchen, and every time I pass by and realize it's been more than an hour since I stirred last time, I give it another twirl. Also, sample occasionally with a spoon to learn when it is sour enough for your taste.
 - When ready, discard the celery and parsley. Sift the borsch through a cheesecloth. If you're not ready to use the filtered borsch immediately, you can safely keep it in the fridge for a couple of weeks.
 - Be sure to save the fermented bran in the fridge for up to a few weeks, and use it next time you want to prepare more borsch - the subsequent batches are usually more sour and flavorful than the first. For the same quantity of borsch, you'll only need half the quantity of base, so you can give half to a fellow cook. To prepare it from the fermented wheat bran, you skip the first two steps and save two days from the process: add about two cups of wheat bran, two tablespoons of corn meal, 3 litters of warm water, stir and be patient for a few days.


Presentation:
 - You will rarely need to present borsch in and of itself - most often, it'll go in a soup. There you go: problem solved.
 - I can think of two reasons you'd want to present this to someone: to drink it directly for its therapeutic effects, or to share it with a fellow enthusiastic cook. For such situations, I find it interesting to showcase it next to a jar where a fresh batch is being prepared. The reason is that, by itself, borsch looks just like a lemonade, while the bran and the yeast in the jar add an interesting texture to the presentation.
 - Another trick you can use to enhance the presentation is to sneak a slice of red beet into the jar, and keep it there until the borsch turns a pretty pink color. Remove the beet, be mysterious to your guests about where the color comes from, and enjoy the conversation.

Stuffed Peppers, Tomatoes, and Summer Squash | Ardei, Rosii, si Dovlecei Umpluti

I've seen stuffed bell peppers quite often here in the United States. That recipe has been always missing something, in my opinion. Back in Romania, we use a more varied selection of vegetables to be stuffed, and also a delicious wine-based sauce to make your taste buds dance with joy. A stuffed bell pepper is quite good, but you might be in the mood for a stuffed summer squash at the moment; or a stuffed tomato; or all of them combined. Why not? With this recipe, everything is possible.


There are a couple more changes in the recipe I present here. First, we Romanians love fattier meats - they are much smoother when cooked. To keep the recipe healthy, I use a lean ground meat (for example, ground turkey breast) which I combine with shredded squash pulp. It has the same effect. Second, we traditionally serve this recipe with sour cream. However, the recipe here features a savory creamy sauce instead, which perfectly complements the stuffed vegetables and can be used instead.


I hope you have a chance to try this authentic Romanian recipe, and I promise it will take you and your guests on a nice culinary adventure in the south-eastern parts of Europe.


Ingredients:
Vegetables to be stuffed (they should all have about the same height)
 - Five small bell peppers
 - Five beef tomatoes
 - Five squash pieces (you'll need to cut them out from two or three larger summer squashes)
Stuffing
 - A pound and a half of lean ground meat
 - Half a cup of rice
 - One small summer squash
 - One large onion
 - One carrot
 - Spices: one tablespoon each of salt, pepper, thyme, and paprika
Sauce
 - One cup of tomato sauce
 - One cup of sour cream
 - Two cups of white wine
 - Ten tablespoons of vegetable oil
 - Half a cup of fresh chopped parsley


Preparation:
 - Cut the tops of the bell peppers, and discard the seeds.
 - Cut the tops of the tomatoes, and carve out their centers.
 - Cut the large summer squashes into pieces (about the same height as the tomatoes and bell peppers). Remove their pulp and set it aside.
 - Now to preparing the stuffing. Finely dice the small summer squash, as well as whatever pulp is left from the larger summer squashes. Mix it with the meat.
 - Finely dice the carrot and the onion. Fry them in three tablespoons of oil for five minutes. Add half a cup of rice, stir, and cook for another couple of minutes. Let cool, then mix with the meat.
 - Add the spices (salt, pepper, thyme, and paprika) to the meat. Mix everything until uniform.
 - Next, stuff the vegetables with the meat mixture. Do leave a bit of space for the rice to expand (maybe enough space for another one tablespoon of mixture to fit in.
 - Now to cooking. We need to use a deep pot where the vegetables can be covered with water, but which can also be used both on top of the oven for boiling, and also inside of the oven for baking. If you don't have a single such pot, two smaller ones will do the job.
 - Coat the pot with the remaining vegetable oil.
 - Gently transfer the stuffed vegetables to the pot. They should be pretty close together, with not much space remaining in between.
 - Pour two cups of wine over the vegetable.
 - Add water to almost cover the stuffed vegetables (leave about half an inch).
 - Start cooking until the water is boiling. Cover with a lid while leaving a bit of space for the steam to escape. Reduce the heat to medium, and cook for 45 minutes. During this time, about half of the water should evaporate.
 - Finely dice the interiors of the tomatoes, and mix it with the tomato sauce and the sour cream. Add to the liquid in the pot and mix gently.
 - Place the pot in the oven (without the lid), and bake at 375F for 20 minutes.
 - Remove the dish from the oven, and sprinkle the chopped parsley on top. It is now ready to be served.


Presentation:
 - The dish as it comes out of the oven features a nice variety of colorful vegetables accompanied by the fresh green of the parsley. It also offers the guests a variety of options to choose from: do they prefer tomatoes, peppers, squash, or a piece of each and every one?
 - When serving, encourage the guests to cut each stuffed vegetable on their plate in two, open it up, and add sauce from the pot over the stuffing. This makes it extra moist, smooth, and delicious.

Baked Chicken with Bell Peppers and Garlic | Pui la Cuptor cu Ardei si Usturoi

My mom cooked this delicious dish a while back, and I loved the subtle garlic hints in the sauce and the juiciness of the meat. The recipe is simple, and the effect is grand. I've just prepared it for guests this past weekend, and got the ultimate compliment: folks using pieces of bread to not waste any single drop of the sauce in their plates.


Ingredients:
 - Five or six chicken legs (drumsticks or thighs)
 - One bell pepper (or one cup of colorful bell pepper slices)
 - Eight ounces of tomato sauce
 - Four tablespoons of vegetable oil
 - Half a head of garlic, sliced
 - Spices: salt (half a teaspoon), pepper (half a teaspoon), thyme (half a teaspoon), paprika (half a teaspoon, optional)
 - Quarter cup of finely chopped parsley


Preparation:
 - Preheat the oven to 375F.
 - Coat a pan with oil. Add half of the tomato sauce, the chicken pieces, then the other half of the tomato sauce on top. Make sure the chicken pieces are nicely covered. Add the sliced bell pepper in between.
 - Sprinkle the pepper, thyme, and paprika. Save the salt for later.
 - Cover with aluminum foil, thoroughly; this helps preserve the juices. Bake for 45 minutes.
 - Remove the foil. Add the sliced garlic. Baste everything with the liquid in the pan. Add salt. Bake for another 20 minutes.
 - Remove from the oven, and sprinkle the chopped parsley on top.


Presentation:
 - Serve the dish as it comes out from the oven (it already features a great variety of colors: the red from the tomato sauce, the green from the parsley, and the color from the bell pepper slices).
 - Serve hot alongside mashed potatoes or pasta, and possibly accompanied by pickles (Romanian style).

Rice Pilaf with Chicken | Pilaf cu Pui

This is one of the first recipes I learned to cook. I was freshly out of my parents' home, out of my country, far away from even the whole European continent: I was a newly enrolled graduate student in the United States. A week or two after landing on the American continent, I started craving for Romanian food. And boy, was it hard to find those delicacies in the area my school was in. I started asking my mom for easy recipes over the phone and over email, and this is one of the first she shared with me.


I did not know anything about cooking rice at that time. At the same time, my mom forgot to warn me that it grows in size tremendously: I guess that's something everyone should know, though I didn't. I was really excited to finally have some food from back home. So, I eyed the quantities for each ingredient in her recipe (slightly different from the one I detailed here), and I filled the pot with the ingredients (including the uncooked rice). And the rice started growing, to my great surprise. One pot of pilaf soon became two, then three. The dish tasted great in the end, just like it did back home. But I had so much of it in such a short time: I ate it for both lunch and dinner, most days, for the next week or so. As such, I really had enough of that taste, and I did not want to see it in front of me for a long time. It's been 15 years, and I finally craved for this dish again. And, as I prepared it, I thought I'd share the recipe with you as well. Hope you give it a try, and if you do, I hope you remember that rice triples in size when cooked.


Before I delve into the recipe, let me also mention that I consider this to be a difficult dish to prepare. The reason is that I like recipes that are more hands-off, where you can leave stuff in the oven or on the stove and not pay much attention to them (for example, I once started preparing the Fall-Off-The-Bone Baby Back Ribs, then I headed to the beach for a few hours of volleyball, only to come home and find the dish almost ready for eating). The rice pilaf takes significantly less time, but it requires one to watch it carefully, and to promptly remove it from heat when ready. The reason for this is that if you keep the rice cooking further, it absorbs more and more moist, it looses texture, and it ends up as a mush.


Ingredients:
 - One onion
 - One red bell pepper
 - One carrot
 - One medium squash
 - Two tomatoes
 - One and a half cups of rice
 - Four or five chicken drumsticks
 - One and a half cups of white wine
 - Three cups of chicken broth
 - A quarter cup of freshly chopped parsley
 - A quarter cup of olive oil (or half a stick of butter)
 - Spices: salt, pepper


Preparation:
 - Preheat the oven to broil or highest heat available; we will need this for the final step.
 - Finely chop the onion, bell pepper, carrot, squash, and tomato. Also finely chop the parsley, but save separately for later.
 - Place the oil (or melt the butter) in a pan, add the chicken drumsticks, and cook on low heat until the chicken changes color (about five minutes). Add the chopped onion, bell pepper, carrot, squash, and spices (salt and pepper) to taste. Cook for another 5 minutes. Add the diced tomatoes, and set aside.
 - Place the wine in a pot, add the rice, and cook on low heat for 5 minutes. Only stir gently and occasionally to make sure the rice does not stick to the bottom.
 - Add the chicken broth over the rice, together with the chicken and the vegetables (also, transfer the oil they were cooked in, as well as any juices there might be: they all help make the recipe flavorful and smooth). Add also most of the chopped parsley (keep a bit for the end). Mix gently. Continue cooking on low heat for another 10 minutes. Try a bit of rice, and cook for a few extra minutes if it still feels undercooked.
 - Make sure the pieces of chicken are at the top. Transfer the dish to the preheated oven, and cook until the chicken gets a nice crust and a beautiful color to the top of the dish. When ready, remove from heat, cover, and let sit for 15 minutes. This final step allows the rice to become more moist and flavorful.
 - Use a fork to gently fluff up the rice. Then sprinkle the final bit of chopped parsley on top, for extra color.


Presentation:
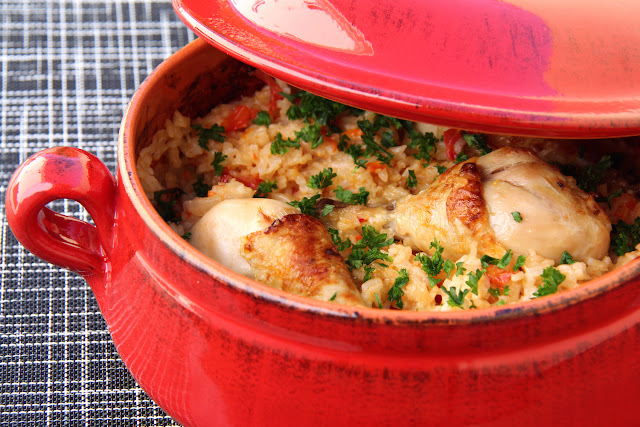
 - The dish looks great in and of itself: an ocean of white rice, with occasional colorful accents from the red bell pepper, carrot, tomatoes, and parsley.
 - If you managed to brown the chicken a bit as well, the presentation should be perfect.

A Renaissance Feast | Iahnie de Fasole cu Ciolan Afumat

I've dreamed of preparing a Renaissance dish ever since I visited a Renaissance Festival in the United States. I noticed that one of the most popular (and more unusual) foods there was the turkey drum, and that was a good starting point. One challenge was to make it tender and moist: this is achieved through slow simmering followed by a quick broil. And what can go better next it, other than some smooth flavorful beans?


Ingredients:
 - One big smoked turkey drum or two smaller ones
 - One each of a small yellow squash, carrot, onion, and parsnip, or half of bigger ones
 - One pound of beans
 - Four or five garlic cloves
 - Four tomatoes
 - Cooking oil
 - A bunch of parsley
 - Spices: a tablespoon of thyme, six to eight bay leaves (depending on size), salt, pepper (whole and ground), chili pepper


Preparation:
 - Put the smoked turkey in about a gallon of water (they should be completely covered). Add three or four bay leaves and a teaspoon of whole black pepper seeds (if you have any). Bring to a boil, then reduce the heat and let simmer for two hours and a half - this helps the drums get moist and tender. When you see the meat start to fall off the bone, place in a tray with a bit of oil and broil in the oven for a few minutes - this should add a nice red tint to the presentation. Note: we're not planning to cook in the oven, just to give it the color, so use the highest temperature possible and keep an eye on the meat. Also, do not discard the water where the turkey simmered - it is a great base for a soup or a stew.
 - We will prepare the beans while the turkey is cooking. We need one pot and one extra large pan. Place the beans in the pot, cover them in water, bring to a boil, then discard the water. Repeat this five times - it helps eliminate whatever makes beans gassy.
 - Meanwhile, finely dice the carrot, parsnip, onion, yellow squash, tomatoes, and garlic cloves. Place them in a pan with half a cup of cooking oil, and simmer on low heat while the beans are cooking. We want them to almost become a puree - it adds a delicious base for the recipe and keeps everyone guessing how you achieved the flavor with no apparent help.
 - Once the beans have boiled in five waters, drain them, and add them to the simmering vegetables. Add about four bay leaves, a tablespoon of thyme, salt, pepper, and a a touch of chili pepper (to taste). Transfer a cup of water from the smoked turkey pot (for extra flavor), mix, and continue simmering for half an hour.
 - When the beans with vegetables are cooked, add some chopped parsley, mix, and remove from heat. Or save the parsley to decorate at serving time (either works equally well).
 - Serve the beans alongside the turkey legs, while they're still hot.


Presentation:
 - Sprinkle finely chopped dill on top of the dish to add an extra splash of freshness to the presentation.
 - We love beans with fresh onions (or scallions) in Romania; they really go well together.
 - Serve alongside a cold beer. I wish I had my stein handy when I took the picture.
 - If you really want to go all in, consider handholding the drums while serving, and make barbaric sounds of enjoyment to show the cook how much you appreciate devouring the dish. I'm sure the kids would love this part.

Orange Cream Cake | Tort de Portocale

This is one of my favorite desserts: it is light, creamy, fresh, and not as overly sweet as many dessert you can buy here in the US. I also love its presentation: a contrast between fresh orange slices and a simple solid cream. In the past, I just waited for someone to prepare and serve it along, and then I would have my taste buds jump up and down with joy. But now I decided it is time to learn how to prepare this dessert myself. Here is the recipe, if you want to give it a try.


Ingredients:
 - Four egg yellows
 - One cup of sugar
 - Two cups of heavy whipping cream
 - Five or six oranges
 - One lemon
 - One cup of milk
 - Two teaspoons of vanilla essence
 - Two packages of gelatin (7 grams each)
 - 150 grams of ladyfingers


Preparation:
 - To start, place a deep (preferably metal) bowl in the freezer: we need it cold to prepare the whipping cream.
 - If you're starting with whole eggs, then separate the yellows from the whites. We won't be using the whites for this recipe - feel free to use them to prepare a healthy omelette or another dessert (how about a Raspberry Foam?).
 - Whisk the yellows with the sugar, then mix with the milk and juices from a lemon and an orange until uniform. Place in a pot on medium heat, and bring to a boil while stirring frequently. The milk loves to bubble up and make a mess on the oven, so keep an eye on it.
 - Meanwhile, mix the gelatin in three tablespoons of water, and let stand for two or three minutes. Add a quarter of a cup of hot water, and mix thoroughly until all the gelatin has dissolved. Pour over the hot milk in the pot, and stir until uniform. Remove from heat, and let cool until it thickens. I usually place the pot in an ice water bath until it reaches room temperature, then transfer the pot to the fridge. We're looking for pudding-like consistency.
 - While the hot mixture is cooling off, you have time to whip the heavy cream. Remove the previously chilled bowl from the freezer. I use a mixer on high speed, and it takes less than 5 minutes to start seeing peaks forming. Add the vanilla essence, and mix until you can easily remove the whisk out of the cream and there is no dripping. Place the whipped cream in the fridge until it is needed. As a note, proper whipped cream could have also used three or four tablespoons of powdered sugar (added in at the same time as the vanilla). But we will combine the whipped cream with the milk mixture, which already has plenty of sugar, so we can skip on adding extra sugar to the whipped cream.
 - Once the milk mixture has reached a pudding-like consistency and the whipped cream is ready, we can go to the final steps of the preparation. We will use a large pot, and we will flip the cake upside down when firm; so whatever goes to the bottom of the pot will become to top of the cake. Coat the pot with a bit of oil, then stretch a layer of plastic foil all around: this will help us flip over the cake without any pieces sticking to the pot. Also, make sure the plastic foil extends past the top of the pot - this will help remove it once we flip the cake over.
 - Extract the juice from one orange and set separately. Feel free to add a splash or rum or amaretto to the orange juice, if you feel adventurous.
 - Peel and slice the remaining oranges, then place them on the bottom and along the side of the pot. This will bring beautiful fresh orange accents to the presentation (see photo above).
 - Once the previous step is ready, quickly combine the chilled milk mixture with the whipped cream. Place about half of it over the orange slices. Dip half of the lady fingers in orange juice, the place the over the cream close to one another. Gently press them in. Continue with another layer of cream, and one more of lady fingers (also dipped in orange juice). Make sure this final layer is pressed into the cream such that it is as flat as possible: remember that we will flip the cake over, and the cake might break if its bottom has ridges.
 - Cover the cake pot with a layer of plastic foil, and refrigerate overnight.


Presentation:
 - For presentation, we will first flip the cake over. Start by removing the top layer of plastic foil. Pick a nice flat plate, place it centered and faced down over the cake pot, then quickly flip the pot over. The final step is to carefully remove the remaining plastic foil.
 - I love the presentation in and of itself: a clean white cake with beautiful orange accents.
 - A few flowers can further add a nice touch of color to the presentation.

Cozonac | Sweet Romanian Bread

Cozonac is one of the festive dishes we enjoy on special occasions in Romania, be it Christmas, New Years Eve, Easter, or a wedding. I remember one of the signs that the holidays are here is when the unique fragrance of cozonac has reached every corner of the home, starting in the kitchen and ending in the living room. The preparation is fairly intensive, but the results are certainly worth the effort, especially if they remind you of festivities or traditions.


An overview of the recipe, and the keys to getting it right.
I was used to the baking another fluffy cake named pandispan: the key to keeping it fluffy is to whisk the eggs until they become airy, then gently introduce the flour into the mix (see that recipe for details). Cozonac is different in that it uses yeast to create the fluffiness, and the process is very different. Baking with yeast requires three key steps: (a) activating the yeast, (b) keeping it at proper temperatures (not too cold nor too hot), and (c) creating a proper environment for it to grow. Let’s talk about each of these in more details.
  (a) First of all, you need to activate the yeast. Think of the yeast as being asleep (this helps preserve its properties on the shelf for a longer period of time), and you need to wake it up such that it helps your recipe grow. The process is simple: yeast is easily activated in the presence of sugar and warm water or milk. I mix yeast and sugar in equal proportions, then I add water warm enough such that I can comfortably hold a finger in it. If everything goes well, expect to see a froth forming on top of the liquid. If you don’t get this step right, then your yeast won’t be active and your dough will most likely not rise - you're better of stopping here and just retrying this step.
  (b) Think of handling yeast as of playing with a delicate kid. If the temperature is low, the kid might catch a cold. If too hot, that won't work either. It is the same with yeast: you want to keep a nice warm temperature, both in the air and also on the surfaces that it touches (for example, the working surface where you handle the dough). I remember that back in my childhood, my mom would raise the temperature in the entire kitchen when cooking this recipe - this helped keep the yeast ready for action.
  (c) Once we put together the dough, we expect the yeast to grow. If the yeast is active, if we kept it at an appropriate temperature so far, and if we plan to keep it at an appropriate temperature from now on, then this should not be a far-off expectation. And still, I’ve followed these steps several times in the past and ended up with a dough that did not grow much. What happened? The answer lies in another important step: kneading. As I had the pandispan recipe fresh in my mind, I took it gently on the cozonac dough, and I kept my kneading short and delicate. This was a mistake: kneading is paramount to getting cozonac right. The reason is that when flour and water are kneaded together, long strands of gluten form from the expansion of certain proteins. These strands allow the growing yeast to easily stretch the dough and form bubbles of air, which is the key to achieving a fluffy cozonac. An effective kneading is simple: press the dough, stretch it, fold it back, and repeat. What is not so simple is doing it for over half an hour (stories of moms kneading for one to two hours are not uncommon). At this point, you may consider buying a mixer with dough hooks to help with the process, particularly if you plan to do this often.


That’s it. A detailed list of ingredients and the preparation instructions are described next. With these in hand, you should feel empowered to prepare cozonac whenever you’re craving for it. No more thinking that you need ‘Romanian’ flour to get it right, and postponing until you actually find it (which is pretty much never). No more paying ridiculous sums to satisfy a craving: I ended up paying $42 a year ago for a cozonac half the size of what I can now do for $5. No more holidays without the house filled with the delicious cozonac smell. Enjoy!


Ingredients:
 - One cup of whole milk
 - Two and a half teaspoons of active dry yeast
 - Three cups of sugar
 - Eight eggs
 - Three cups of ground walnuts
 - Two sticks of unsalted butter (about 225 grams, or a cup when melted)
 - Two tablespoons of rum essence
 - Two tablespoons of orange peel
 - Four tablespoons of oil
 - One tablespoon of coffee powder
 - A quarter of a cup of cocoa powder
 - Five and a half cups of unbleached bread flour (I prefer the King Arthur Flour brand)
 - Pinch of salt
 - Optional: one cup of raisins or cubed turkish delight pieces


Preparation:
 - Mix two and a half teaspoons of active dry yeast with two and a half teaspoons of sugar. Add a cup of heated whole milk (the temperature should be such a way that you can place a finger inside and comfortably hold it in there). Let sit for 30 minutes: this helps activate the yeast. When ready, you should see froth formed at the surface the milk.
 - Meanwhile, coat two loaf pan with butter. Melt the remaining butter on low temperature and allow it to cool to room temperature.
 - Carefully break the eggs and separate the whites from yellows as follows: one cup with two yellows, one cup with six yellows, and two cups with four whites each.
 - Whisk four egg whites, then incorporate a tablespoon of rum essence, and whisk until uniform.
 - Whisk six egg yellows until their color lightens up, then gradually incorporate a cup and a quarter of sugar and a tablespoon of orange peel. Whisk until uniform.
 - Sift the flour in a large bowl and add a pinch of salt.
 - Once the half an hour has passed and the yeast is activated in the milk, quickly mix it with the melted butter and with the whisked egg whites and yellows. Pour this over the sifted flour. Mix with a wooden spoon until uniform.
 - Now to kneading: here's where you'll have to use your hands instead of the wooden spoon. Coat your hands in oil, and start turning and ponding the dough. Periodically coat your arms with oil again and again until you use all the four tablespoons of oil - this prevents the dough from sticking to your hands, while also making the cozonac more moist. Continue kneading for at least 30 minutes.
 - Once kneading is done, place the dough in a warm environment (near the oven should work), cover with a towel, and let stand for 45 minutes. This is a good time to put together the filling (next step).
 - Whisk the other four egg whites, then gradually incorporate a cup and a quarter of sugar. Gently sift a quarter cup of cocoa powder and mix it in. Add a tablespoon of rum essence, one of orange peel, and one of coffee powder. Finally, add three cups of ground walnuts. Mix everything and set aside.
 - Once the kneaded dough has stayed for 45 minutes (it also hopefully grew in size to some degree), cut it in two: we will be making two cozonacs. Take each half and flatten it with a rolling pin. Add a thin layer of the filling, and optionally the raisins or turkish delight pieces. Roll tightly from two opposite sides such that clean dough meets in the middle: it helps to keep the filling in during cooking. Seal the two ends and gently twist it around - this gives it a more interesting shape when cooking. Place each twisted roll inside a loaf pan (previously coated with butter). Cover with a cloth towel and let sit for one hour in a warm place.
 - Finally, use the two remaining egg yellows to coat the cozonacs, sprinkle the leftover sugar on top, and optionally decorate the top with walnut halves. Place them on the lowest shelf in an unheated oven. Set the temperature to 325F and start the cooking process. Note that the cozonacs will continue to grow in size as the dough raises. Do not open the door while they are cooking, particularly during the first half an hour - hopefully your oven has an internal light and a glass front door that allows you to peek in without opening. Start keeping an eye on the cozonacs after about 25 minutes of cooking. You want their tops to have a pleasant reddish brown color: once this happens, cover them with aluminum foil, and keep cooking. The total cooking time is about an hour after the oven reaches 325F. To check when they are ready: stick a toothpick all the way in, remove it, and check that it is clear and dry. If not ready, cook for another five minutes, then check again.
 - Once the toothpick comes out dry and clear, turn off the heat and let the cozonacs stay in the oven for another 15 minutes. After all this, remove the cozonacs from the oven, cover them with a towel, and allow them to cook slowly. Do not cut them for the first 15-20 minutes after they were removed from the oven.

Presentation:
 - The top of the cozonacs looks beautiful, so they often don't need much help in the presentation. Alternatively, slices have intricate shapes of alternating bread and filling, with occasional spots of color from the turkish delight. A beautiful presentation in and of themselves.
 - A few fruits can further add color and freshness to the presentation.
 - Serve it alongside a glass of milk, or accompanied by a glass of wine.

Romanian Garlic Chicken Aspic | Piftie | Racitura

Back in the days, Romanian families would sacrifice a pig at the beginning of December, then use it to prepare all sorts of delicacies for the holidays. Nothing was left aside: we have a great variety of tasty recipes that use most parts (not only the meat). As such, the holidays season brings a lot of specific dishes that are not easily encountered throughout the rest of the year.


'Piftie' or 'racitura' is one prime example of such a recipe. It uses some of the meat, but most importantly the pig's feet. When boiled, the feet create a lot of gelatin, which causes the dish to thicken like a jello when cold. As it's not so easy to find pig feet abroad, and also as chicken or turkey are lighter and easier on the stomach, I present a variation of the recipe that can be easily prepared with fairly common ingredients. Note that I recommend using packaged gelatin: I used pigs feet in the past, but I found them to add some flavor that was out of place in combination with the chicken meat - gelatin does the job without adding any extra taste.


Ingredients:
 - Three to four pounds of chicken legs or wings (you need a lot of bones and skin to add taste, and some meat)
 - One head of garlic, peeled and mashed
 - One carrot
 - One parsnip
 - One onion
 - Two celery stalks
 - Three bay leaves
 - One tablespoon of black pepper seeds
 - Gelatin (a few packages, depending on soup quantity left after boiling)
 - Salt
 - For decoration and serving: bread, mustard, parsley, radishes, scallions, bell peppers


Preparation:
 - Boil the chicken in water on medium heat for about two and a half hours. Discard the foam periodically to keep the soup clear.
 - Add the carrot, parsnip, onion, celery stalks, bay leaves, and black pepper seeds. Boil for another hour.
 - Add the mashed head of garlic, and fix for salt. If the soup is too greasy, then a layer of fat will form at the top - feel free to remove and discard it.
 - Now to thickening the soup. The chicken bones and skin are most likely insufficient to make the soup coagulate. If you want to check this: take a bit of soup in a jar, place in the fridge until it cools, and check its consistency. Most likely, you will need to add gelatin to thicken it. Check the instructions on your gelatin package, and use about two thirds the recommended gelatin proportion for making jello. For example, if the instructions tell to combine a package with a cup of water, then you want to use about two packages for three cups of soup. Check how much soup you have: I ended up with six-seven cups, so I used four packages of gelatin. Check the instructions on the package: I initially added the gelatin to a cup of soup, let it sit for about a minute, then I thoroughly mixed this with the rest of the soup.
 - Separately, pick the chicken meat, shred it, and set it aside. Also, save the carrot (for color). Discard the chicken bones, skin, and all other solid ingredients in the soup.
 - Select a few deep bowls. Place parsley and carrot pieces on their bottom, then add chicken meat on top. Carefully add the soup over, but filter it through a tea strainer to make it as clear as possible.
 - Let it refrigerate overnight.


Presentation:
 - When ready to serve, remove one of more bowls with the dish from the fridge. Carefully flip them over onto flat plates: this upside-down soup with smooth edges is a most dramatic presentation.
 - Feel free to use extra parsley to garnish the dish.
 - Serve with bread, mustard, and fresh vegetables (radishes, scallions, or bell peppers). Feel free to use some of them to further improve the presentation.

Lentils

I was introduced to lentils in an Ethiopian restaurant many year ago, and I felt enamoured with their unique flavor and consistency. I did not know how to cook them for a long time, until I finally experimented and found a recipe I love: a savory combination of lime and cumin, masterfully complemented by aromas of fried garlic and ginger.


Ingredients (about 10 servings):
 - Two cups of lentils (mixed, yellow, or red preferred)
 - One red bell pepper
 - One onion
 - Ten baby carrots
 - A head of garlic
 - Ginger (about a third the quantity of garlic)
 - Juice from one lime
 - Half a cup of olive oil
 - Spices: salt, pepper, cumin, chili pepper flakes


Preparation:
 - Wash the lentils, then soak them in water overnight. Note that the lentils will grow in size, so allow for extra water: I use six cups of water to soak two cups of lentils.
 - Clean and chop the bell pepper, baby carrots, onion, garlic, and ginger. Keep the garlic and ginger separately.
 - Heat the olive oil in a cooking pot on medium heat. Add the chopped bell pepper, baby carrots, and onion, and fry for two-three minutes while stirring occasionally.
 - Add the garlic and the ginger, and fry for another couple of minutes.
 - Drain the soaked lentils, and eventually run them through some clean water if you want to. Add them to the frying pot, and add five cups of clean water. Stir and make sure nothing sticks to the bottom. Cover, bring to a boil, then reduce the heat to medium-low and simmer for 25 minutes.
 - Add salt, pepper, cumin, and a touch of chili pepper flakes. Cover, and continue simmering until it reaches the desired consistency (about 10 minutes).
 - Remove from heat when ready, then add the lime juice.
 - Serve warm or hot.


Presentation:
 - I like the lentils when they're creamy, but the mush does not have the most interesting color. Fortunately, the red bell pepper and carrot chunks sprinkle color pops throughout the dish. I presented the recipe in a bowl that matches them in color.
 - A couple of slices of lime can be further used to garnish the dish: lime is one of the ingredients, and it adds a fresh green tint to the presentation.

Cajun Roasted Chicken | Pui la Cuptor cu Legume

The cajun roasted chicken is becoming my favorite dish for when I have guests coming over. One reason is that it's great looking - a big colorful piece of tender meat. It additionally allows for a smooth introduction to an exotic cuisine: I always serve this alongside an authentic Romanian garlic sauce. It also offers a lot of variety: some people like dark meat, some like white meat, there are vegetables, an adjustable degree of spiciness via the garlic sauce, and I usually add a few mushrooms next to the chick for vegetarians. Finally, it's very simple to prepare and does not require much attention: you basically spend 30 minutes to put together la pièce de résistance for the whole dinner (the rest of the preparation time is hands free while the bird is roasting in the over).


One more note on this recipe. The chicken as a whole is a big piece of meat, and many people find it challenging to choose the appropriate time and temperature such that the chicken is juicy yet properly cooked. This recipe presents a simple solution to the conundrum: cook the chicken covered to keep it moist while killing bacteria, then remove the cover to finish the preparation and to give the dish a nice color. This is the kind of easy trick that can help anyone prepare impressive meals.


Ingredients:
 - One chicken (about 3 pounds)
 - Six or seven medium-sized red potatoes
 - Two carrots
 - One onion
 - One squash (optional)
 - One red bell pepper (optional)
 - A bunch of parsley
 - One beer
 - Cooking oil
 - Spices: salt, ground pepper, cajun spices


Preparation:
 - Preheat the oven to 450F.
 - Meanwhile, peel and dice the potatoes and carrots. Boil them for about 10-15 minutes.
 - Coat a 2 inches deep baking tray with a bit of cooking oil. Add the boiled potatoes and the carrots. Peel and dice an onion, and add it in (I've been told more than once that the onion in this recipe was the best tasting onion the guests have ever tasted). Optionally, dice a squash and a red bell pepper, and add them as well. Gently mix the vegetables until they're equally distributed: you don't want a corner with bell peppers and another one with the carrots - it just does not look as good in the presentation. Add salt and pepper over the vegetables.
 - Generously coat the chicken with cajun spices (both inside and outside). Place in the baking tray, over the vegetables.
 - Pour a can of beer inside the chicken and over the vegetables. It would be great if the vegetables are covered in beer (particularly the onion), but make sure the liquid is not all the way to the top of the tray: there will be some extra juices from the chicken, and we don't want them to overflow the tray and mess up the oven. It is perfectly fine if you open a second bottle of beer, add those critical couple of teaspoonfuls over the recipe, then drink the rest. :)
 - Carefully seal with aluminum foil (helps keep the chicken moist), and cook for two hours in the oven at 450F. Drop the temperature to 400F, remove the aluminum foil, and cook for another half an hour (or as long as needed, depending on the size of the chicken -- use a thermostat to check) on the lowest rack to finish cooking and give the skin some color. Check periodically - if the chicken skin starts turning too dark but the chicken is still not fully cooked, then brush it with the juices covering the vegetables, and place a sheet of aluminum foil over the chicken to preserve the color.
 - Remove from the oven. Serve hot or warm.


Presentation:
 - The chicken on the cooking tray looks impressive in and of itself. I'd just place it in the middle of the table, on a heat-resistant serving mat.
 - Use the bunch of parsley for both color and freshness. Either place it on the side, as in the photo above, or alternatively, chop it finely and sprinkle it all over.
 - With your permission, I suggest you serve this recipe accompanied by some authentic Romanian garlic sauce. It is a killer combination that always makes an impression.

Meatless Balls | Chiftelute Vegetariene

I've recently decided to reduce my consumption of meats, which means I have more chances to enjoy the delicious flavors and textures of fruits, vegetables, and nuts. That also gives me more opportunities to play around with healthy organic produce and to come up with new concoctions. Here, I present a yummy recipe for meatballs that lacks, well, meat.


I started the thought process by imagining what combination of ingredients might come close enough to meat. I chose red beets for both color and texture. I added squash to keep the dish flavorful and juicy, as in the my earlier Romanian meatballs recipe. I thought couscous would also go well into the composition (it adds consistency). Finally, I added ground walnuts for their rich flavor and for a bit of unexpected crunchiness. Throw in the onion, garlic, and spices, and the mixture smells so good and fresh that you want to eat it with a spoon before it's even cooked.


I further find interesting the progression of color in the original meatball recipe and in this variation. The meatball recipe starts with a pink colored mixture, a healthy tint brought about by the meat. However, the meatballs turn brown during the frying process. The color pigments in the red beets are much more persistent, which allows the meatless balls to maintain a beautiful pink tint all throughout.


Ingredients:
 - Two red beets
 - A medium-sized squash
 - Half a cup of garlic cloves
 - Half an onion
 - Two cups of walnuts
 - One cup of parsley
 - Four eggs
 - One cup of couscous
 - Spices: salt, ground pepper, thyme, a bit of chili pepper
 - For frying: flour (about a cup), and a lot of cooking oil


Preparation:
 - Preheat the oven to 450F. Cover the red beets in aluminum foil, and bake for 90 minutes. Remove the beets from the oven and let cool. Then carefully peel, chop (I use a food processor), and set aside.
 - While the beets are cooking, place one cup of water in a pot, add two tablespoons of oil and a pinch of salt, and bring to a boil. Remove from heat, then quickly stir in a cup of couscous, cover, and let stand for five minutes. Use a fork to stir the cooked couscous until fluffy.
 - Clean, peel, and chop the squash, half of an onion, garlic cloves, walnuts, and parsley. Mix with the beets and couscous when ready.
 - Add the eggs and spices to taste. Mix everything until the composition is uniform.
 - Now to the cooking part. First, heat up the oil on medium heat. I use a deep pan, and I make sure the oil is about two inches deep (we want to have the balls completely covered in oil when cooking, such that their outer part cooks quickly and uniformly.
 - Use about two spoons of mixture to form each ball shape. Roll them through flour, then fry them for about two minutes each.


Presentation:
 - Even when cooked, the vegetarian meatballs will have a nice pink/red color due to the beets. Choose some fresh ingredients of colors that complement this: for example, fresh parsley or scallions.
 - I chose to present a few balls in a black long dish with a red outline: the black helps emphasize the nice colors in the meatballs, while the red delimits the presentation (while also matching the main color theme in the dish). An alternative presentation of this appetizer could have involved a bunch of meatballs in the center of a wider plate, surrounded by greens (scallions, cucumber slices, celery, or parsley), and accompanied by some cherry tomatoes and feta cheese cubes for extra color. Play with your imagination and your sense of style, and I am sure you can come up with even better presentations.

Sour Beef Soup | Ciorba de Vacuta

This is a tasty soup with many vegetables and occasional gifts of tender meat. As an extra bonus, the lemon flavor and the sour cream smoothness come to satisfy your craving for an ethnic touch. You really can't go wrong with this recipe, if you're looking for a simple recipe that you'd enjoy in a Romanian home.


Ingredients:
 - Two pounds of beef (preferably with bones, for example back ribs or short ribs)
 - Three medium-sized carrots
 - Three medium-sized parsnips
 - One celery root
 - One red bell pepper
 - One green bell pepper
 - One yellow onion
 - Three small potatoes
 - Two zucchini
 - Two lemons
 - Four large tomatoes (or one 14.5oz can of diced tomatoes)
 - Three tablespoons of tomato paste
 - One bunch of parsley
 - One pound of sour cream
 - Spices: salt and pepper


Preparation:
 - Add the beef and one gallon of water to a big pot. Cover, bring to a boil, then reduce the heat to simmer (not a lot of bubbles): this helps keep the soup clearer. Cook the beef for an hour and a half, while periodically removing the foam.
 - While the beef is boiling, you have plenty of time to clean and dice the vegetables. You may want to keep them in cold water such that they stay fresh and don't change color (particularly the potatoes).
 - After an hour and a half of boiling the beef, remove it from the water, separate the meat and cut it in cubes, and discard the bones. Add the meat back to the soup, together with the diced carrots, parsnips, and celery root. Continue simmering for another 15 minutes.
 - Add the diced bell peppers, onion, and zucchini, and let them simmer for 10 minutes.
 - And the diced potatoes, and the tomatoes. Carefully mix the tomato paste in the hot soup until it becomes liquid (you can also remove a cup of hot soup, mix it with the tomato paste, then add it back to the soup). Continue simmering for 15 more minutes.
 - Remove from heat. Add the squeezed lemons, the chopped parsley, and sour cream, salt and pepper to taste. Mix, cover, and let the the flavors blend for 5 minutes.
 - Serve hot.


Presentation:
 - If possible, choose a soup bowl that is wider and shallower - this helps some of the diced vegetables break through the soup surface to reveal nice colors and texture.
 - Have extra sour cream handy, if your guests want to add more.
 - Sprinkle chopped fresh parsley on top to an extra touch of freshness.
 - Serve alongside sliced bread and chili peppers (fresh or preferably pickled).

Romanian Dumplings with Plums | Galuste cu Prune

This Romanian dessert has three layers: a sweet crispy coating, a soft inner dough, and a fruity core. A first bite from the dumpling usually samples the first two, only to slightly reveal the latter and to invite another mouthful. It is a great treat during the plum season, and a delightful way to savor this fruit.


Ingredients (makes between eight to ten dumplings, depending on size):
 - A pound of plums
 - Two large russet potatoes (about a pound and a half)
 - Two eggs
 - Half cup of cream of wheat
 - Flour (three quarters cup of flour for the middle layer, and a bit more to help mold the dumplings)
 - Four tablespoons of butter (a quarter of a cup)
 - Two cups of coarse breadcrumbs (i use panko breadcrumbs, as they're bigger; alternatively, put a few slices of bread in the oven at 375F, and when they get hard, grind them to crumbs)
 - Brown sugar (one cup for the outer layer, and a bit extra for the plums)
 - Spices: cinnamon, vanilla essence (two tablespoons), and a pinch of salt


Preparation:
 - Preheat the oven to 425F. Bake the russet potatoes for about an hour (use a toothpick to test when ready). Let them cool a bit, then peel and grind them (I use a potato ricer).
 - Melt the butter in a pan on medium heat. Add the breadcrumbs, stir in one tablespoon of vanilla essence and cinnamon to your taste, and cook for a few minutes until they turn a nice golden color. Remove from heat, stir in the brown sugar, and mix till uniform.
 - Cut the plums lengthwise in half and remove the pits. Sprinkle sugar and cinnamon on the plum meat, and let sit for a while. I prefer the smaller Italian plums, as you can use both halves together in each dumpling (if the plums are bigger, use only half per dumpling).
 - Gently mix the baked potatoes with the flour, cream of wheat, and a pinch of salt. Add the whisked eggs and one tablespoon of vanilla essence, and mix till uniform. It is ok if the composition is a bit sticky.
 - Now to forming the dumplings. Coat your palms with a bit of flour. Grab three-four tablespoons of mixture and gently press it flat to about a third of an inch. Roll the dough uniformly around a plum (or only half of it if the plums are big) - there should be no piece of the plum visible to the outside. Gently sprinkle a bit of flour on the outside, such that they don't stick to one another. Repeat until all dumplings are done.
 - Bing enough water to a boil in a large pot. Add the dumplings one by one. Boil them until they raise to the top (about 5-10 minutes), plus another 5 minutes.
 - Remove the dumplings from water, one at a time. You need to handle them very gently, as the exterior is fairly soft and can break easily. Roll the dumplings through the golden breadcrumbs mixture, then set aside.
 - I prefer to serve them at room temperature, but they're also good warm or cold.


Presentation:
 - Choose a nice serving plate or bowl whose color matches the beautiful golden texture of the dumplings.
 - I present the dumplings alongside a few extra plums - they are at the core of the recipe. Any guest who also tries a plum will get to appreciate the extra vanilla and cinnamon flavors we added to the dish. Or you can cut the fresh plums lengthwise, remove the pits, and sprinkle them with cinnamon and sugar (such that they more closely resemble the ones in the prepared dish).
 - A few leaves of mint always bring a glimpse of freshness to the visual presentation.